Testing DDEV with VMware Workstation Pro

Introduction
DDEV works in various environments, and it’s often tested in virtual machines, but nested virtualization can be hard to set up and may impact performance.
In 2024, VMware Workstation Pro became free for personal use.
This guide shows how VMware Workstation Pro can be used to prepare environments for both Windows and Linux, where Docker and DDEV perform well even inside a VM.
Warning: Nested virtualization may not work on all systems:
Virtualized Intel VT-x/EPT is not supported on this platform. Continue without virtualized Intel VT-x/EPT? VMware Workstation does not support nested virtualization on this host. Module ‘HV’ power on failed. Failed to start the virtual machine.
If this occurs, search for known workarounds specific to your hardware and BIOS/UEFI configuration. It worked out of the box for me on Arch-based Linux but did not work for Randy on Windows 11.
Installing VMware Workstation Pro
Download and install VMware Workstation Pro. You must click on the link to the terms and conditions to accept them before downloading (checkbox is inactive by default). Packages are available for Windows and Linux.
On Arch-based systems, install via:
yay -S vmware-workstationInitial configuration steps:
- Edit > Preferences > Workspace > Default Location for Virtual Machines - use location with sufficient space
- Edit > Preferences > Hotkeys - remember shortcut to escape the VM, the default is Ctrl+Alt.
- Edit > Preferences > Updates > Configure update behavior
- Check other settings
Installing Windows 11
Download the Windows 11 Disk Image (ISO) for x64 devices.
In VMware:
- File > New Virtual Machine > Typical > I will install the operating system later
- Select Windows 10 x64, not Windows 11 x64 (I don’t want to use TPM encryption)
- Specify 100 GB disk, stored as a single file
- Customize hardware and finish:
- Set at least 8GB RAM
- Number of processors: 2, number of cores per processor: 2
- Virtualize Intel VT-x/EPT or AMD-V/RVI (check)
- Virtualize CPU performance counters (check)
- Network Adapter > Connect at power on (uncheck) - to be able to set up a local Windows account and skip Windows updates
- Sound Card > Connect at power on (uncheck) - I don’t like any beeps on the first boot, will be turned on later
- USB Controller > Automatically connect new USB devices (uncheck if you don’t need USB devices)
- CD/DVD (SATA) > Use ISO image > Browse - select ISO file
To apply additional low-level VM configuration, close VMware itself and use the script below:
#!/usr/bin/env bash

# This script changes more settings than the GUI allows
# Tested only on Arch-based Linux
# Run it from the virtual machine directory

vmx_file="$( (find ./*.vmx -maxdepth 1 -type f 2>/dev/null | head -1) || true)"

if [[ "${vmx_file}" == "" ]]; then
    echo >&2 "Unable to find *.vmx file in the current directory."
    exit 1
fi

# from https://wiki.archlinux.org/title/VMware
declare -A vmware_configs=(
    # 3D acceleration
    ["mks.gl.allowBlacklistedDrivers"]="TRUE"
    # 5 buttons mouse for windows
    ["mouse.vusb.enable"]="TRUE"
    ["mouse.vusb.useBasicMouse"]="TRUE"
    # disable logging
    ["vmx.scoreboard.enabled"]="FALSE"
    ["logging"]="FALSE"
    ["vmx.buildType"]="release"
    # paravirtual adapters
    ["scsi0.virtualDev"]="pvscsi"
    ["ethernet0.virtualDev"]="vmxnet3"
    # performance
    ["MemTrimRate"]="0"
    ["mainmem.backing"]="swap"
    ["prefvmx.useRecommendedLockedMemSize"]="TRUE"
    ["MemAllowAutoScaleDown"]="FALSE"
    ["sched.mem.pshare.enable"]="FALSE"
    ["prefvmx.minVmMemPct"]="100"
    ["mainMem.partialLazySave"]="FALSE"
    ["mainMem.partialLazyRestore"]="FALSE"
    # config
    ["tools.syncTime"]="TRUE"
    ["numvcpus"]="4"
    ["cpuid.coresPerSocket"]="2"
    ["memsize"]="8192"
    ["vhv.enable"]="TRUE"
    ["vpmc.enable"]="TRUE"
)

for key in "${!vmware_configs[@]}"; do
    value="${vmware_configs["${key}"]}"
    line="${key} = \"${value}\""

    if grep -q "^${key}" "${vmx_file}"; then
        sed -i "s/^${key}.*/${line}/" "${vmx_file}"
    else
        echo "${line}" >> "${vmx_file}"
    fi
done

echo "Updated ${vmx_file}"
Press “Start up this guest operating system”.
If Windows 10 was chosen as virtual machine type:
- Wait for the “Select Image” screen (where you choose which Windows to install), press Shift+F10 to open
cmd, writeregedit, openHKEY_LOCAL_MACHINE\SYSTEM\Setup - RMB (right mouse button) on Setup > New > Key > write
LabConfig - RMB on Values area > New > DWORD (32-bit) Value > write
BypassSecureBootCheck, set1 - RMB on Values area > New > DWORD (32-bit) Value > write
BypassTPMCheck, set1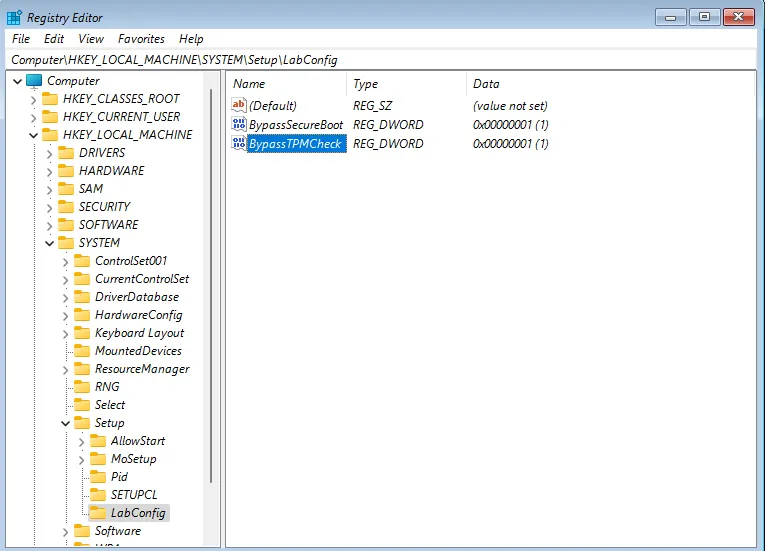
After the first reboot (installation is not done yet), don’t select country in the initial setup:
- Press Shift+F10, enter
OOBE\BYPASSNRO(Oletter, not number) directly incmd. This is needed to force creation of a local account (I don’t want to login anywhere here).
After Windows boots:
- VMware Menu > VM > Install VMware Tools
- Open Explorer, select
D:drive with mounted tools, and runsetup.exe - Reboot
Windows configuration:
- Settings > Windows Update > Pause
- Explorer > This PC > View > Show > Filename extensions, Hidden items
- Settings > Home > Rename
- Settings > System > Power > Screen and sleep timeouts > Never
- Settings > System > Sound > More sound settings > Sounds > No Sounds, uncheck “Play Windows Startup sound”
- Settings > Personalization > Taskbar > Task View (uncheck), Widgets (uncheck)
- Settings > Personalization > Taskbar > Taskbar behaviors > Taskbar alignment > Left
- Settings > Apps > Startup > Disable Microsoft OneDrive
Registry configuration:
# Remove recommended applications from the Windows 11 start menu
reg add "HKEY_LOCAL_MACHINE\SOFTWARE\Policies\Microsoft\Windows\Cloud Content" /v DisableWindowsConsumerFeatures /t REG_DWORD /d 1 /f
# Disable Meltdown and Spectre fixes that slow down Windows
reg add "HKEY_LOCAL_MACHINE\SYSTEM\CurrentControlSet\Control\Session Manager\Memory Management" /v FeatureSettingsOverride /t REG_DWORD /d 3 /f
reg add "HKEY_LOCAL_MACHINE\SYSTEM\CurrentControlSet\Control\Session Manager\Memory Management" /v FeatureSettingsOverrideMask /t REG_DWORD /d 3 /f
# Mouse cursor on the default button
reg add "HKEY_CURRENT_USER\Control Panel\Mouse" /v SnapToDefaultButton /t REG_SZ /d 1 /f
# Enable developer mode feature
reg add "HKEY_LOCAL_MACHINE\SOFTWARE\Microsoft\Windows\CurrentVersion\AppModelUnlock" /t REG_DWORD /v "AllowDevelopmentWithoutDevLicense" /d 1 /f
# Set old right click menu
reg add "HKEY_CURRENT_USER\SOFTWARE\CLASSES\CLSID\{86ca1aa0-34aa-4e8b-a509-50c905bae2a2}\InprocServer32" /ve /f
# Restart Windows Explorer
taskkill /f /im explorer.exe
start explorer.exe
# disable reserved storage in Windows 11
dism /Online /Get-ReservedStorageState
dism /Online /Set-ReservedStorageState /State:DisabledCreate a standard user account for broader testing coverage
Testing with both an administrator and a standard user account catches permission-related issues that only surface for non-admin users.
To add a standard user account: Settings > Accounts > Other Users > Add account > I don’t have this person’s sign-in information > Add a user without a Microsoft account, then set a username and password.
Apply the same Windows configuration steps to the new account as well.
When switching between accounts, use Sign Out - not Lock. Locking prevents VMware Tools from loading in the other account’s session.
Shutdown the virtual machine, press “Edit virtual machine settings”:
- Hardware > Network Adapter > Connect at power on (check)
- Hardware > Sound Card > Connect at power on (check)
- Hardware > USB Controller > Automatically connect new USB devices (check if needed)
- Hardware > CD/DVD (SATA) > Connect at power on (uncheck)
Press “Start up this guest operating system”, and run inside Windows:
- Search > Disk Cleanup
- Search > Defragment and Optimize Drives
At this point, the VM uses more disk space than needed. We can shrink guest on hosted platform:
-
Add VMware Tools to PATH, run Terminal as admin:
cmd /c "setx /M PATH ""C:\Program Files\VMware\VMware Tools;%PATH%""" -
Restart PowerShell, and run Terminal as admin:
VMwareToolboxCmd.exe disk shrink c:\ -
Wait until
*.vmdkfile at virtual machine location will be shrinked.
VMware Menu > VM > Snapshot > Take snapshot.
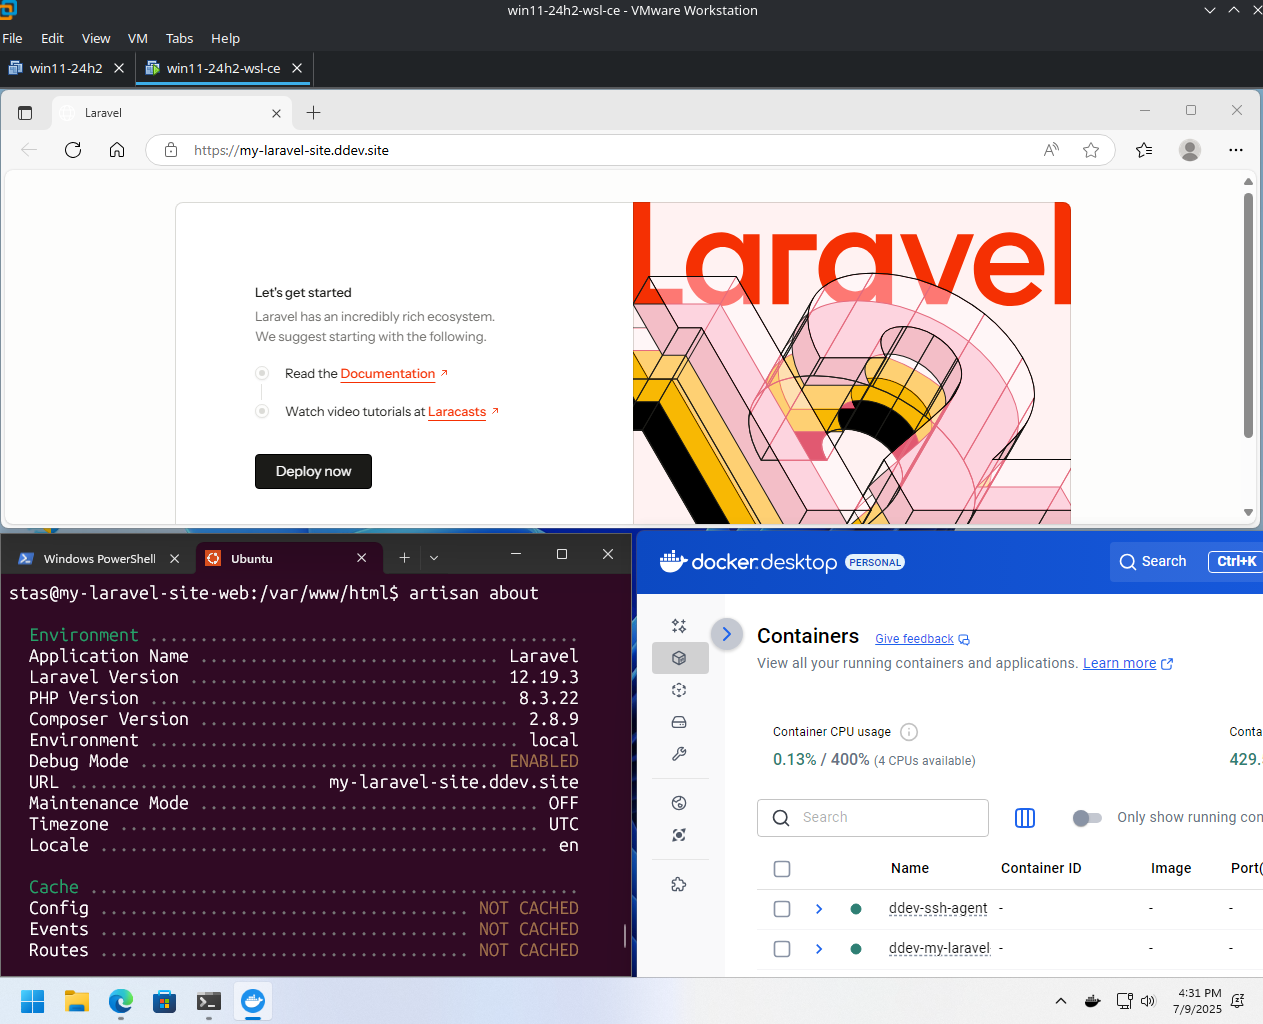
Install Docker and DDEV. Create additional snapshots as needed.
Installing Linux
Follow similar steps as for Windows, using a Linux ISO (e.g. Ubuntu).
Install VMware Tools inside the guest:
# Debian-based:
sudo apt-get install open-vm-tools-desktop
# Fedora-based:
sudo dnf install open-vm-tools-desktop
# Arch-based:
sudo pacman -S open-vm-tools
If display resolution is incorrect:
sudo systemctl restart vmtoolsd.serviceIf copy/paste from/to the host doesn’t work:
vmware-user
# or
vmtoolsd -n vmusr
References:
- https://github.com/vmware/open-vm-tools/issues/627
- https://github.com/vmware/open-vm-tools/issues/568
To configure shared folders inside the guest:
mkdir -p ~/Shared
echo "vmhgfs-fuse $HOME/Shared fuse defaults,allow_other 0 0" | sudo tee -a /etc/fstab
sudo systemctl daemon-reload
sudo mount -a
Shrink Linux VM disk, take a snapshot, then proceed with installing Docker and DDEV. Create additional snapshots as needed.
How Do You Test DDEV?
If you use a different setup that performs well, consider contributing a guest post to ddev.com or sharing your findings.